Monday, February 28, 2011

Reaper Duke Gerard Conversion Part 1

I came across this Reaper miniature and thought it would make a nice character figure for a friend who is starting a Blood Angels army. I have a small Space Marine force painted in Dark Angels Green myself, so I decided to get one for myself too.

The figure comes in 4 pieces plus a 25mm square base. The hands are moulded to the shield and the axe.


Being a Crusader, the figure had cross motifs sculpted onto the shoulder pads and hip plates - I filed these off because my own Space Marines chapter did not feature a cross motif, and I also cut off the bits of rivets which did not make sense on a Space Marine armour (I know, I know...). I then cut the tab off and drilled a hole in the right foot, so I could mount the figure on a scenic resin base.


A Space Marine bolter arm cut off at the wrist provided the sci-fi flavour for the figure - this particular arm came from a Blood Angels bitz lot, so I had to slice the blood drop motifs off. I drilled a hole in the hand to fit a pin, and also drilled through the muzzle and the flash-suppressor holes. I had picked a bolter with sling.


This is what the figure looks like primed and dry-fitted together.


Viewed from a slightly oblique angle, you can see how the way the cape and sling are sculpted and the way the figure is positioned on the resin rock base give it a dynamic pose.

Sunday, February 27, 2011

FPW Game 1, Umpire's Cut

I see wahj has beaten me to the post while I was writing about my goblin king...

Well, here's my version of the story and I'm sticking by it.

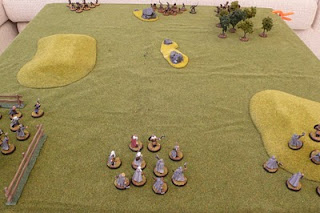
I drew the 'River' table, which had the French 1st Division bolstered by their Corps Artillery reserve facing the Prussian 13th and 14th Divisions.


As you can see wahj has cut enough felt squares for us to use it to indicate the terrain.

I did not have enough figures to represent all the forces involved (I bought enough for one full division per side, and the Prussians brought two to this fight) so I ended up using a 2-base system with a tab for each unit - the tab indicated the unit designation and has a number of '0' on it to indicate the Combat Effectiveness - we simply checked one off each time the unit took a hit, which allowed me the umpire to be able to have a record of the unit strength after the battle.


I mounted my camera on a tripod and stopped it down to f22, so you can see the players in action. The French have effectively divided the battlefield on the east bank into two by their terrain placement, and the Prussians have returned the favour.


The Prussians mass their guns on their left flank...


As the combat heats up, drawing in the French reserves, the 15th Division arrives by the other road and begins to cross the river.


Fierce melee at the riverbank sees both sides taking heavy casualties.


Eventually the French manage to extricate themselves just as the sun sets, preventing pursuit. The 1st Division had stalled the Prussians, but paid a heavy price in return. The Prussian infantry have taken a beating themselves crossing the river under Chassepot fire and charging into the mouths of the French guns, but their artillery have emerged from the battle unscathed and will lend their full weight at the final battle.

FPW Game 1

(Cross posted on my own blog here)

The first of 4 games played between me (French) and Martin (Prussian), this one was the "river" map. The larger aim for the French is to either reduce the Prussian forces, or to delay them, such that the Prussian forces approaching along this route would arrive late, or diminished, for the final battle (the fourth game).


The top of the map is East, and the bottom of the map, from which French forces must retreat and Prussian forces give chase, is West, towards Paris. Game mechanics allowed for competitive placement of terrain, and I chose as many pieces of difficult terrain as possible - three hills overlooking the river, and swamps to obstruct movement. Martin got to place the two bridges though, and they were placed in the only remaining avenues of movement.


I set up the Divisional Commander in the village, with the reserve (a regiment of Zouaves, hidden) so he could move them to whichever bridge the Prussian main attack developed on.


On the right side of the table, the southern bridge was held by 2 regiments of the division, with the bulk of the divisional artillery.


As it turns out, the main Prussian attack came across this bridge.


With a 2 to 1 advantage, and a preponderance of artillery, the Prussians quickly forced the crossing, and established a bridgehead.


The French reserve was committed from the village towards the Southern bridge ...


... where the most bitter fighting of the game occurred.


In the end, I made the maximum time limit to delay the Prussian forces, and barely kept the routes of retreat open for the French forces to live and fight another day. A final charge by a lone unit of Prussian Hussars just missed shutting the door on the retreat.

The French lost one entire regiment (the 45th, which I knew from the start was a forlorn hope), and most of their Divisional artillery (ouch). The Prussians lost fewer units, but received casualties throughout, and these two Divisions will arrive late for the final game.

The next two games are going to be tougher: this was the only map with the opportunity to channel the Prussians into clear lanes of advance covered by fire.


The Railroad and Open map are going to see Prussian superiority in artillery tell, I suspect

Random Sunday shot


I bought a half-painted Moria Goblin King figure off ebay to round up my small goblin force. It came mounted on the base and almost fully painted except for the arms, which had been glued on but had fallen off.

After some two-part expoxy and minimal deflashing, much black paint to cover over the previous paintjob, I managed this in fewer than 24 hours. I like the animation on the fellow. It towers over the other goblins, and the triple-chin and portly stomach adds character to it.

I wonder if there is a back-story to the fox motif of his armour.

Sunday, February 20, 2011

Random Sunday shots

I started painting again after a long break, so I thought I might put some pics up.


A Zvezda 1:72 Medieval Lifeboat (painted and rigged by me) shown next to a GW LOTR Dwarf (bought painted off ebay) for scale. I think I might like this rigging business - the Revelle 1:50 Viking Longship is looking tempting...


Dug up my old Space Marines from more than 10 years ago. Most of them are falling apart, but I think once I get my hands on a bottle of Dark Angel Green I should be able to give them a new lease of life.

An Iron Wind Metals centaur warrior with weapon sawn off, to be used as a Bull Centaur Star Player for my Greek-themed Blood Bowl team.


Shown here with the rest of the team (L - R): Crocodile Games Spartan, IWM centaur, Eureka Miniatures Pan, IWM Chorrim, Shadowforge Dark Temple centaur, Reaper minotaur.

Tuesday, February 15, 2011

Strandhogg Fantasy Playtest Cont'd

After a quick dinner, I started the game.

Instead of drawing cards for initiative, I decided to rolle a die and have each side alternate activating a warband.


The dwarves went first and moved the warband on their left towards the hill and started shooting at the goblins opposite them. I did not realise then but I had already made a mistake with the rules - shooting comes *before* movement. This meant that for the first few turns the archers were more of a threat than they should have been. Fortunately they didn't cause too many casualties to unbalance the game from this point on.

The use of the template to resolve shooting was fun, quick and easy. More than once a figure was hit twice by shots not even aimed at it!

The goblins responded by sending their right flank forward, while their left crept around the woods to engage the dwarven right flank. The centre, led by their noble, took cover by the rocky outcrops and sniped at the dwarven left.

I realised I could keep track of which warband needed to test for morale at the start of their activation by leaving casualties on the table - just count the number of figures lying down, roll for morale, then remove them.

Combat was quick and deadly, and the dwarven left quickly lost its archers and the warriors fell back.

I gave the goblins an Aglity of 6 vs the Dwarve's 5, which combined with the goblins' larger unit size and hence larger command radius meant that they were more manoeuvreable. The Dwarven noble and the central warband simply could not get to the fighting quick enough.

While this was happening, the goblin left flank formed into an attack wedge and threatened the dwarven right, while its archers despatched their counterparts.


The dwarven centre tried to dislodge the goblins from the hill but came under attack from both sides and were soon decimated. Even the return of the left flank warband could not salvage the situation.


At this point I decided to call the game - the dwarves have lost more than half their numbers while the goblins have lost less than 25% of theirs.
The goblins had the advantage of speed and numbers, and while their Courage was lower than that of the Dwarves and they could not initiate melee as often as the Dwarves did, this did not affect their ability to cause casaulties as combat was 'simultaneous' - i.e. a figure that initiates melee can be killed as a result. The use of a d10 for combat also made things more unpredictable.
In hindsight I guess I could have expected the dwarves to do badly - they were after all poorly armoured and largely shieldless. In the next game I may have the goblins come across Dwarven Warrior warband with shields and thus ability to form shieldwalls.
Terrain was also a bit sparse. Perhaps a few buildings smack in the middle of the table to break it into a few lanes will make a more interesting game.
This was a straighforward fight - I expect with the addition of missions, animals to capture, banners and musicians things will become more varied.

Monday, February 14, 2011

Strandhogg Fantasy Playtest

Coming down with the flu means a few evenings of self-quarantine at home, so I decided to dig up the old LOTR figures I bought years ago for Dark Age skimish and finally give them a spin (I know, a normal person would use historical Dark Age figures for a Dark Age set of rules, or use fantasy figures with a fantasy set of rules...).

The rules I have settled for are the Strandhogg rules, but what I plan to use the rules with are...

Dwarves. I commissioned a whole lot of these off ebay when a painter was offering them on a massive discount. I got the rangers, the regular armoured guys, both in plastics, and a few elite warriors and command figures plus a ballista and crew in metal.

I didn't specify the colour scheme, but serendipitously the rangers come painted in three different flavours: blue sleeves, green sleeves, and brown sleeves, which makes it easy for me to tell between different warbands. I use 3 armoured dwarves as the warband leaders, and the king figure as the Noble.


Their oponents are Moria goblins, here taking an overland trip to raid a dwarven village (wait till you see the resin village buildings and 25mm farm animals I've bought for this project...). The goblins are from a few separate ebay purchases, and once again it just so happens they come in the right size for Strandhogg warbands. In this case I can distinguish the 3 warbands by their basing style, and each warband comes with one helmeted sword-and-shield figure, who will serve as the warband leaders - perfect!

I do lack a goblin king figure, so an orc stands in here.


Rather than to set the game up on my dining table, I have decided to use my coffee table for this trial game.
Let's see how it plays then...