Monday, October 29, 2012

Project Graveyard - Final

Thanks to all the readers who left encouraging comments - I am glad to announce that Project Graveyard is complete.

Carrying on from the previous instalment...

The "frame" is sprayed black and then painted in medium grey and drybrushed in light grey. The fence sections are sprayed black, and then painted with a silver paint that leaves a gunmetal finish.

The "insert" is likewise sprayed black and then painted in brown, and highlighted with the same brown paint mixed with some grey paint.  I chose to flock it with Varied Dry Grass from Realistic Modeling instead of my usual green mix to give it that desolate feel.   
The scene is then completed with a crypt, a tree stump, tombstones, and some dried flowers from my potpourri jar (what? A man can't like nice scents?).


I had fun making this, and now fg, Thomas and I are thinking of collaborating on another project: Project Vampire Mansion. I will make an insert for the grounds of the mansion to be fitted inside the same fenced area, fg will build the Warhammer Chapel he has, and Thomas will rig some flickering LED lights for the interior. Stay tuned.

Crypt from Thomarillion
Tombstones and tree stump courtesy of Fantascene
Flock courtesy of Realistic Modeling Services

Sunday, October 28, 2012

Halloween Weekend Game: Zombicide

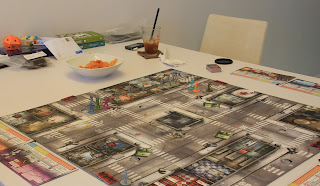
For the Halloween weekend game I suggested we play a themed game, and fg suggested Zombicide, which he got as their Kickstarter offer.

The rules were pretty simple, so we set the boards up and played the first scenario...

Game - check. Drinks and chips - check. Halloween decoration and candy - check.
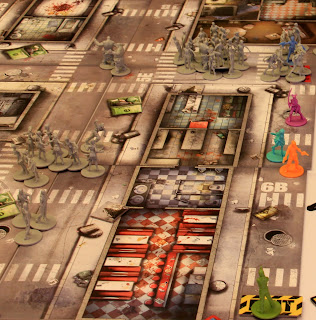
We were not even one quarter through the objectives before our characters got surrounded by zombies and massacred.

The end for our unfortunate 'survivors'.
Despite a poor initial showing, we decided to replay the scenario, this time with more caution, taking care to spend some time searching for good equipment to make sure all the characters were properly armed, and that as far as possible characters did not level up before all the other characters were also close to levelling up (as the number of zombies raised is pegged to the level of the highest-level character in the game).

This time round we did better, managing to get to all the objectives before the numbers began to pile up and make it look hopeless... and then El Cholo (the Danny Trejo lookalike) sacrificed himself to allow the others to escape with the items required to win the scenario.

'Go! Get to the exit!' El Cholo lays his life down, that others may live.

We made it! Amazingly, Doug, the figure in blue, ultimately made it too.
We had a lot of fun. The game has a rather well-designed algorithm for zombie movement, which means no referee was needed. It is however very tactical, and running around without forward planning would mean a quick end (as we learnt in our first attempt).

The only thing I found lacking was a sense of urgency built into the game; however, this is something easily remedied by the employment of a clock, or the appropriate frame of mind.

I can see us playing this game again, which frankly is about as high a praise as you can give for a boardgame?

Wednesday, October 24, 2012

Project Graveyard WIP 3

I've combined two evening's work together since there wasn't much progress on account of waiting for the glue to dry.

A layer of masking tape is taped over the entire piece, leaving only the steps and dug grave exposed, and then a layer of white glue is spread over the entire surface.

My usual 'spice mix' of sand and gravel is poured over the insert. When dry, flagstones made from thin card is glued to the path.

The front gate section is removed to show the interior better.

I am still not sure what colour to paint the ground; my usual basing colour is too red and warm for what I am planning to convey here, so I am thinking either a black prime followed by a dark brown and then a drybrush of brown mixed with grey, or to go black and grey.

I won't be able to work on this tomorrow, but I will have all of Friday to prime and paint the pieces, and hopefully put the finishing touches on this project on Saturday.

Monday, October 22, 2012

Project Graveyard WIP 2

Having purchased some mounting board, I went on with phase 2 of the project: the bases.

I glued the rails/frame for the fences onto a mounting board and cut the base out, then sealed the edges with masking tape with disguise the various layers and the joints of the plastic strips.

For the actual cemetery ground itself I decided to make a separate removable board. This once again gives me some flexibility - I can easily model a new landscape if I didn't like my first attempt, or make new inserts for different terrain types.

Once I cut out an insert of the appropriate size, I sketched the basic layout with pencil - a flagstoned path leading to the crypt, with a central dirt track leading to the sides, dividing the interior into four plots.

I used foamcore to build up the height of each plot. In one plot I cut out an open grave. The sides of the foamcore plots are cut at a bevel, and the pieces glued to their assigned places. I didn't have to be very precise because I plan to use masking tape to smooth out the contours.

The baseboard, insert, and sketched layout. Note the open grave and cut for steps.

The parts assembled. A base is added to the crypt and steps added to the cut in the slope.
Now I must wait overnight for the glue to dry before going on the phase 3: terraining.

Sunday, October 21, 2012

Project Graveyard WIP 1

I've been sitting on the graveyard project for quite a while, but this afternoon I was suddenly seized with the Halloween spirit and decided to start work on it.

Now a big part of the delay was my indecision over what size to make the piece. After some discussion with fg, we decided to make it modular, usable with both the fence set I got, as well as the PMC walled compound piece.

After toying with a few ideas, I decided on mounting the fence sections on a sort of a rail system, made by the versatile plasticard and plastistrips I had lying around. This will allow me to take the fence down for storage, as well as substitute "ruined" sections of the side walls as required by the scenario.


I also made the decision to cut the fence down to a shorter length, which would make the base board of the piece smaller and thus less prone to warping. The resulting piece is just a little bigger than an A4 size, which is easy to store and use. In one corner you can see the crypt I bought from Thomarillion, a plaster piece.


Later this week I hope to work on the base board itself - a piece of mounting board with some undulation provided by foamcore, with a central path leading from the gate to the crypt in one corner, and other plots for the gravestones that fg has, plus a creepy dead tree for the other corner.

Sunday, October 14, 2012

Armed and not too dangerous

While I wait for the 15mm figures from Martin, I painted up some armed peasant, a project inspired by Matt.


The three command figures are Perry plastics, the men Crusader Miniatures 'Peasants and Pilgrims' pack, and the women and children I frankly can't remember now. I bought them mainly to use them in Strandhogg skirmishes, but with the addition of a leader, standard and musician, you can convert almost any 20mm square-based group of figures into a Warhammer unit. In this case I can use them as an Empire Free Company unit.

Inspired by Matt, I too decided to convert a few of the figures to make them look more varied - you get 2 of each pose in the Crusader pack. The first guy on the left was given a wooden shield from the Perry sprue, and the second guy had his sword replaced by a length of toothpick. I think he is the toughest guy in the bunch because who else would go into battle with just a stout stick?

The fourth guy had his axe converted into a flail using the end of a morning star handle and two links of chain from a GW beastmen sprue - rather than to use a real chain, I decided a rigid length of plastic chain was easier to work with.

The last guy had his spearhead swapped for a polearm head from a Perry sprue. I don't think there is a farm implement that looks like that, but it seems to work.


All the figures were spray-primed red-brown and then painted in earth tones. I chose a (very) limited palette to give them a sense of cohesion.


I think this is one group of figures I wouldn't mind adding to. Now when does Foundry have its sale?

Monday, October 01, 2012

Character-Building

With my Space Marines completed and the Attalid Pergamenes yet to arrive, I have a time slot between projects that is too short for me to start on any of my outstanding ones (several one-dozen 28mm figures jobs lined up), yet I do not want to stop painting for fear of losing momentum.

What do you do in times like this? You build characters.


The beastman is a Resina Planet Khaos Gor. After looking at a few options, I decided to add some putty onto his legs to disguise that fact that he has scrawny ones. Then for good measure I threw in a piece of driftwood I found on the beach at Foca (of the Phokians fame) in front of them, stained with Devlan Mud.


The female dwarf is from Scibor, a gift from fg. Her shield is unfortunately miscasted, but let's just call it battle-damage. I replaced her rather cartoony sword with a mace from a Perry WOTR box. I think I will call her Mathilde.


These two characters will join my small beastmen warband and my rather bigger dwarf hold.